As a follow up to my previous post, I finished the shots I’d been taking with the disco ball, and they turned out pretty well.
I didn’t manage to get my camera settings right for capturing the disco ball lighting with a shorter shutter speed, meaning that my pictures didn’t capture the pinpoints of colored lights that the disco ball gave off. But, I manager to use an effect in Photoshop that gave me exactly what I needed.
First, I brought the disco ball colored shots into Photoshop. Then, I found a nice “pin point of colored light” image on Pexels and brought it into Photoshop. Here’s the image by itself:

Then, I used select and mask to isolate the parts of band scene that I wanted, and placed copy of the party lights image beneath.
Finally, I played with the transparency on the primary image until the party lights were incorporated into the shot.
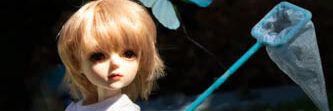
Here’s the image of Ester (now named Faye) in my original:

And here it is with the party lights showing through.

Looks great! You’re a Photoshop whiz!
When I started, I had some idea that I’d be spending most of my non-photographing time building items for my dolls. Turns out, the thing I do most is Photoshop 🙂
Pingback: Unusual lighting for doll photographs: Using a disco ball to light a scene – Small Life Stories